How to Use RecMaster on Windows
RecMaster is an easy-to-use and feature-packed screencasting software that gives customers one-click solution for recording everything on the virtual desktop. With it, you can capture video for gameplay, webinar, online movie, live streaming, instructive course, webcam and similar. More than a video recorder, RecMaster also enables you to annotate video recording, add effects to video recording, edit video recording, record audio only, and share whatever recording to YouTube and Google Drive.
Please follow this guide to get everything you need to know about how to use RecMaster on Windows-based computer.
Useful Links & Buttons
What’s New on Latest Version (V2.2)?
The latest version of RecMaster now is V2.2 with updates as follows. If you can not find some of the new features in this user manual.
Please jump to Explore New Features in RecMaster V2.2 to get the detailed information.
Main updates in V2.2:
- Improved Auto Recording Feature:Segment, Auto-record, and Schedule
- Show Keystrokes in Real-time: keystrokes, key combinations, normal keys, and mouse clicks
- Hide the System Taskbar And Status Bar
- Magnifier in Full Screen mode and Custom Area mode
- Add the circular webcam
- Add the Automatic Gain of Microphone/System Sound
Get Started
1.1 System Requirements
Supported OS: Windows 7, Windows 8(.1) , Windows 10 (both 32-bit and 64-bit versions included), and Windows 11.
Processor: 1 GHz Intel® / AMD® processor or above.
RAM: 1GB RAM (2GB or above is recommended).
Hard Disk Space: 200MB of hard-disk space for installation.
1.2 Download
1.3 Installation
Double click recmaster.exe and follow the wizard to complete the setup. Then you can launch it to a trial version like this:
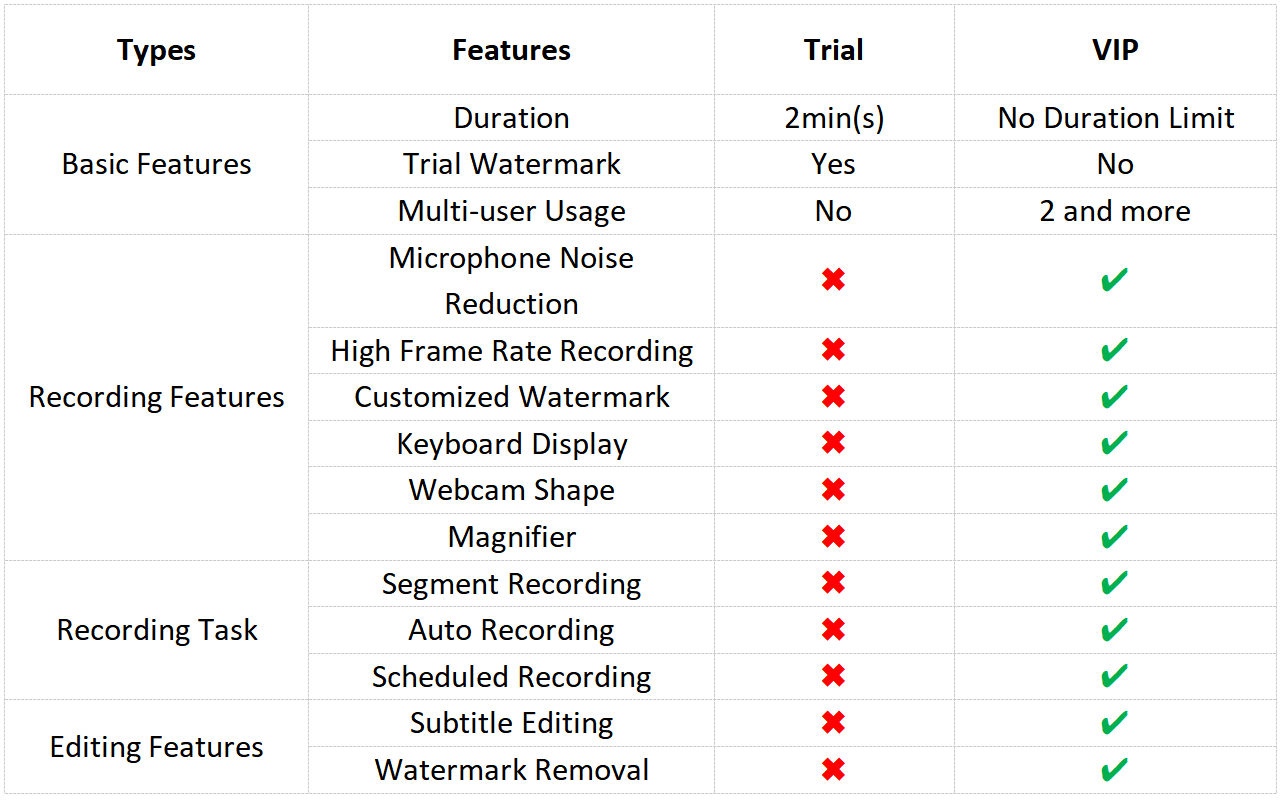
1.4 Trial Limits
The free trial version has some limitations on recording.
If you want to remove limits and enjoy the full feature of RecMaster, you can upgrade to RecMaster’s Pro version by purchasing an activation code here or from the software interface by clicking “Purchase” option.
When the purchase is completed, you will receive a valid activation code in your e-mail soon.
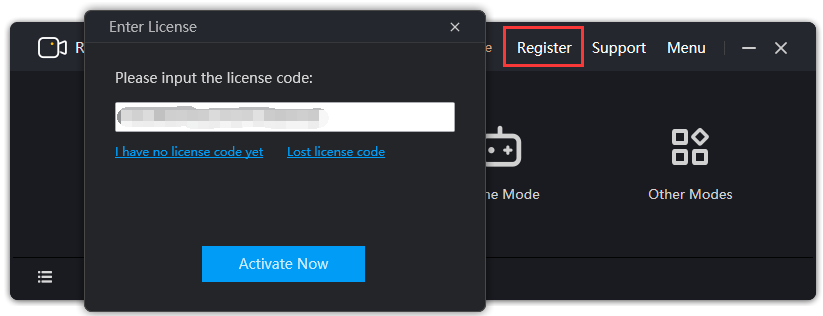
1.5 Registration and Activation
Open up or go back to the RecMaster’s main window. Then click Register on the tool right toolbar to input your license code to complete the activation. When you have done this successfully, you can enjoy the full Pro version of RecMaster with no limit.
Main Window
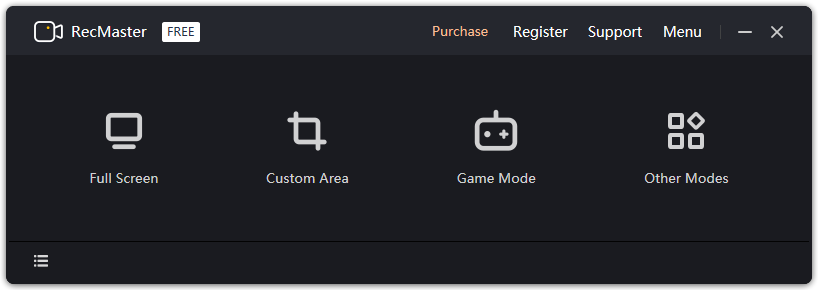
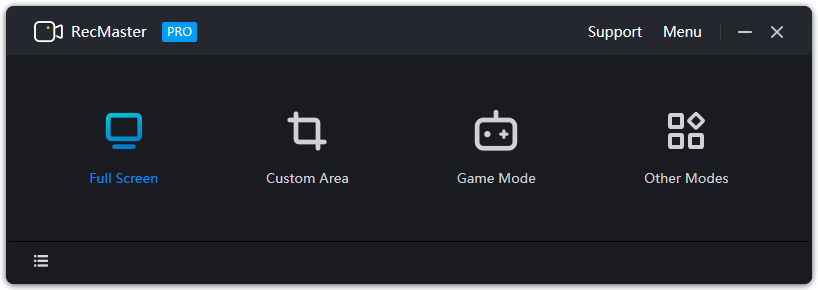
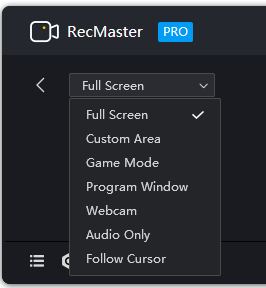
2.1 Seven Capture Modes
RecMaster offers seven capture modes on the main interface – “Game Mode”, “Full Screen”, “Custom Area”, “Webcam”, “Follow Cursor”, “Program Window” and “Audio Only”, among which Custom Area gives an access to “Mobile Phone Mode” for mobile-friendly vertical video capture. Users need to choose a desired recording mode and then start the recording. Below are the details.
2.1.1 Game Mode
2.1.2 Full Screen
2.1.3 Custom Area
2.1.4 Webcam
2.1.5 Follow Cursor
Follow Cursor mode enables you to select a suitable size and only record the screen within a limited range around the cursor.
2.1.6 Program Window
In this mode, you can select any running program to record. Other programs cannot cover it. If the recording screen size changes during the recording process, the recording will stop automatically.
2.1.7 Audio Only
2.2 Register
As is mentioned above, you will get a license code in your email after you completed your order. And here Register option is the place where you should input your license code to become a registered user. Below is the UI after registration.
2.3 Support
By clicking the “Support” button, you will be lead to our support page.
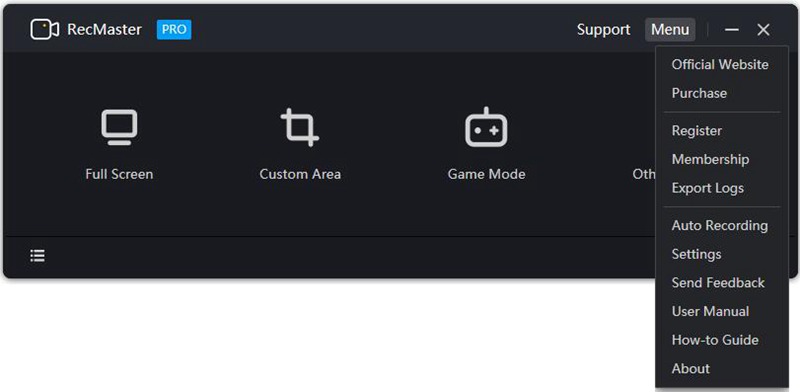
2.4 Menu
By clicking the drop down of Menu, you can directly visit RecMaster’s official website, check for software updates, write and send feedback, export software log file, enable Auto Recording, check your subscription status and more information about RecMaster.
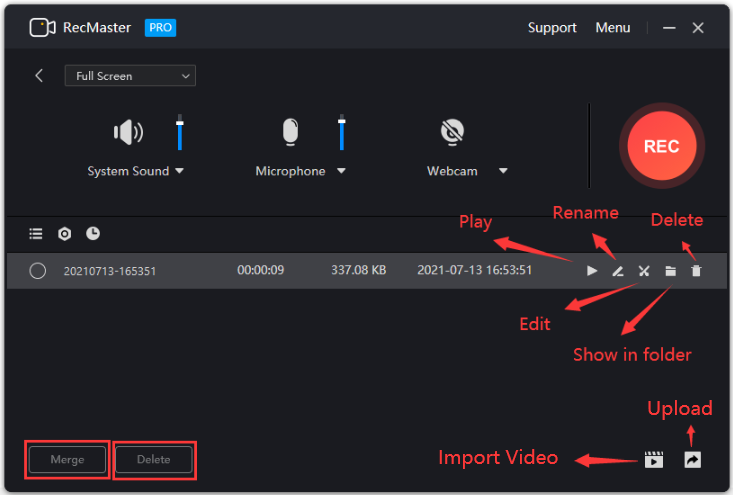
2.5 Recording List
By clicking the icon in the left corner, you can see the recording list and play/rename/edit/locate/delete/share the recorded video.
Settings on Main Window
3.1 Full Screen/Custom Area/Audio Only Mode

3.1.1 Select Recording Mode
If you want to switch recording mode, you can do the change here directly and don’t need to go back to the main interface to re-select.
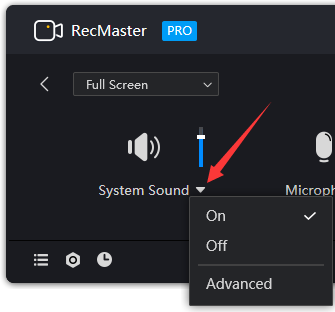
3.1.2 System Sound
To screen record with system sound, such as browser and app sound, you need to turn it on here. The volume is adjustable, too.
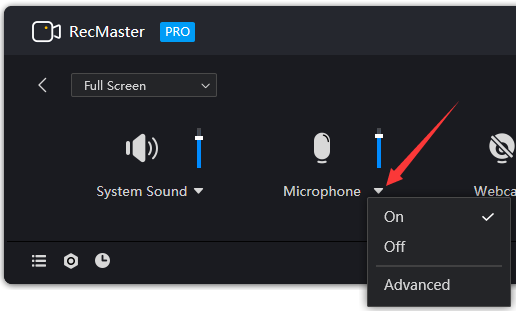
3.1.3 Microphone
To capture external microphone sound during recording as voice over or so, please turn it on and tweak its volume to a proper level.
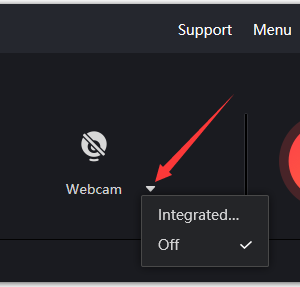
3.1.4 Webcam
When webcam is turned on, the front camera video will show up so that you can create a picture-in-picture video. You can select the cameras if there are multiple ones.
3.1.5 Start/Pause/End Recording
Generally, you can tap the red circle button to start and end the recording. Alternatively, you can use the hotkeys to start, pause and end, Alt+1 is for start/pause and Alt + 2 is for end by default. Note all hotkeys are adjustable under Menu >> Settings >> Hotkeys.
3.1.6 Recording list
3.1.7 Settings
3.1.8 Task Schedule & Auto Recording
By clicking “Task Schedule & Auto Recording”icon, you will enter into another window where you can enable segment recording, Auto-record in full screen upon RecMaster launch, set the end recording conditions to automatically end recording when the recorded file reaches the set length/size, and create future recording task for any live streaming, webinars, sports event and similar automatically. These features are only available when RecMaster runs in the background. So do set an auto startup under settings.
3.2 Program Window Mode
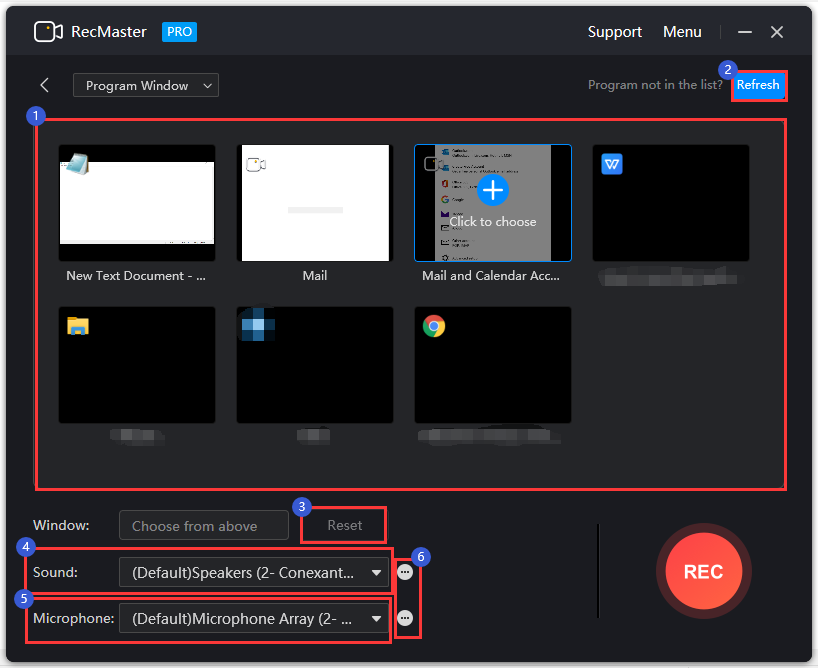
3.2.1 Choose Program
You can select a program to be recorded here.
3.2.2 Refresh
If you don't find the program you need, you can click the Refresh button on the top-right corner to find the target program again after refreshing.
3.2.3 Reset
Click the Reset button, you can re-select the target program to record.
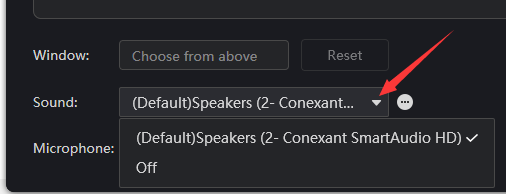
3.2.4 Sound
You can choose to turn on or off the system sound. Once disabled, you will not record any sound from the computer. It’s useful if you hope to make your recording mute or only record your voices without the system sounds.
3.2.5 Microphone
You can choose to turn on or off the microphone.

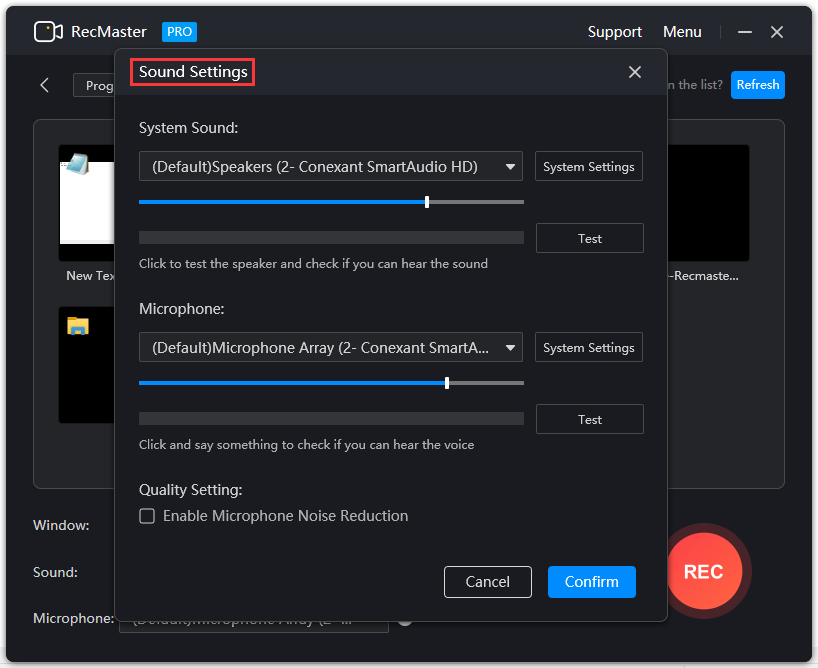
3.2.6 Sound Settings
Click the “...” icon here and a new window will pop up. You can test whether the system sound and microphone are normal in the sound settings. If you want the microphone sound to be clearer, you can enable the microphone noise reduction.
3.3 Webcam Mode
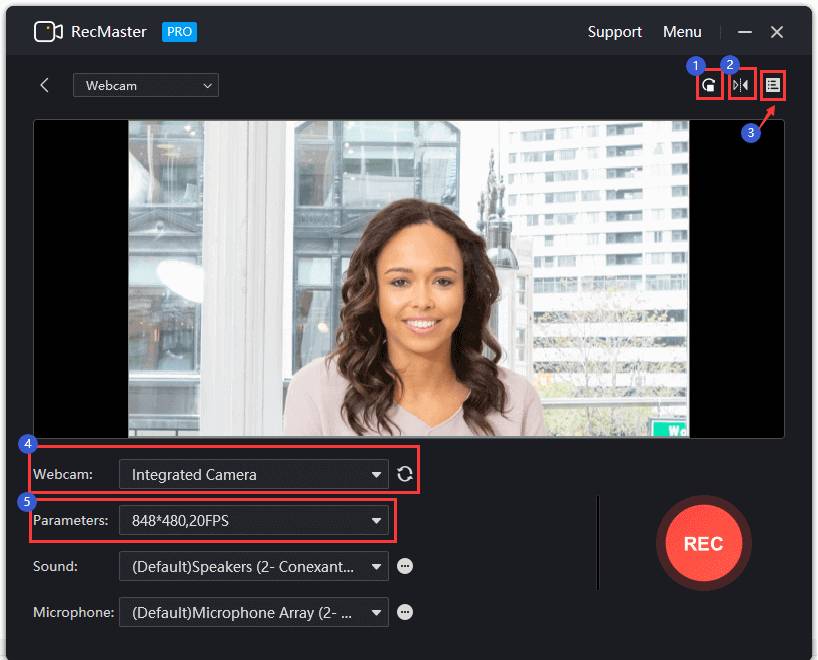
3.3.1 Spin
Clicking the Spin icon, you can spin the recording screen. There are four different angles to choose from. With this feature, you can easily Rotate the camera 90° on each click.
3.3.2 Flip
Clicking the Flip icon, you can flip the recording screen.
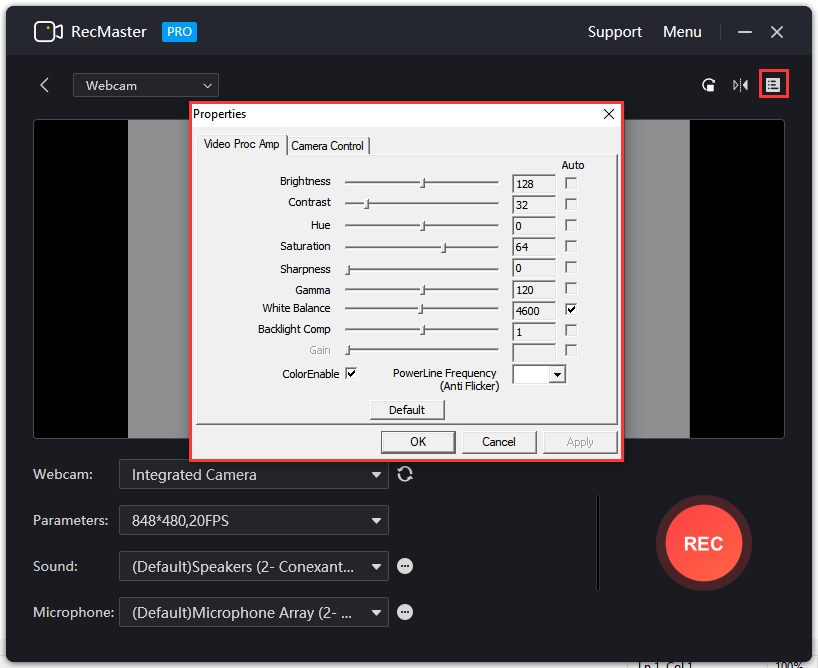
3.3.3 Properties
Clicking the Properties icon, you can set the properties and effects of the camera, such as brightness, contrast, sharpness, backlignt camp, etc. This is only available when your webcam supports to set the properties.
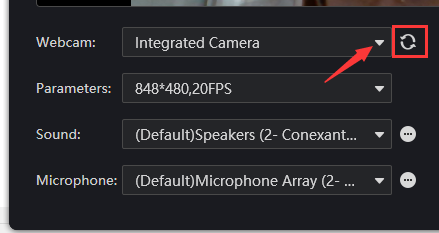
3.3.4 Webcam Selection
If you have multiple webcams on your computer, you can select a target webcam to record. If you cannot find the target, you can click the Refresh icon on the right to refresh and try again.
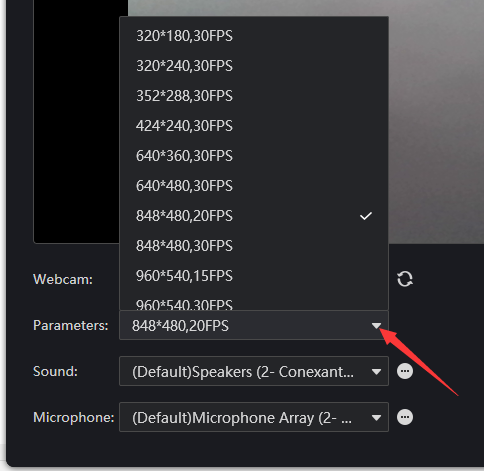
3.3.5 Parameters
You can choose the appropriate recording size and FPS (frames per second).
3.4 Follow Cursor Mode
You can use Follow Cursor mode to record the screen within a limited size around the cursor, and the recording range will move with the cursor. For more details about Follow Cursor mode, please click here.
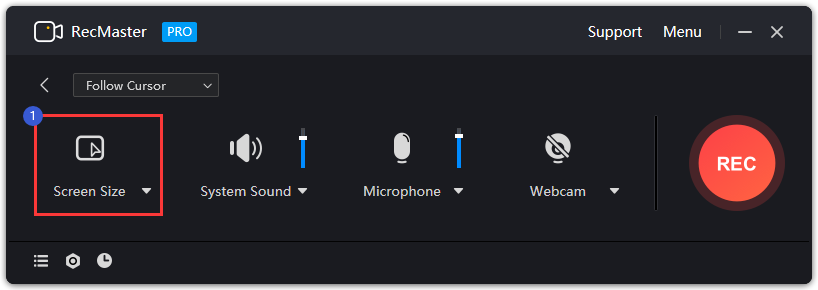
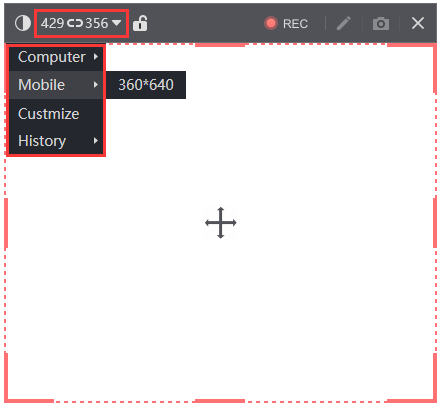
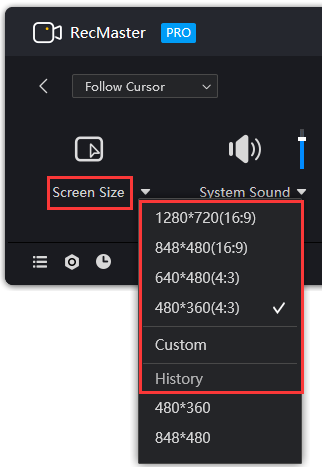
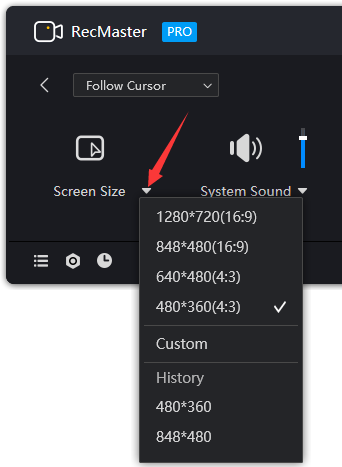
3.4.1 Screen Size
In this setting menu, you can choose four common sizes, you can also customize the size or use the historical size.
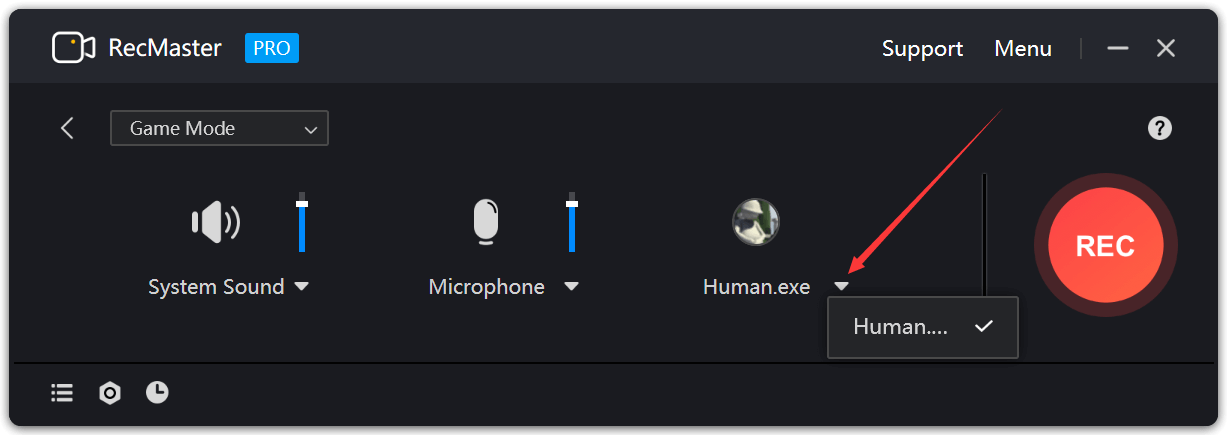
3.5 Game Mode

3.5.1 Choose Game
Launch your game and RecMaster, swiching between the two programs. RecMaster will detect and choose the game exe automatically.
Settings
Apart from the obvious functional settings located on the main window, there are some more you can customize on Settings control which you can access by clicking Settings icon on the main Window.
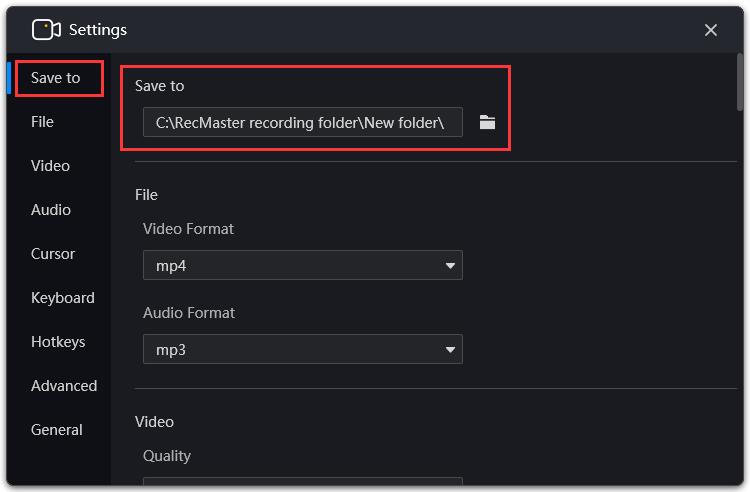
4.1 Save to
Here in the screenshot, the recording files are saved to C: \RecMaster recording folder. You can click Destination Folder icon to select and change the saving path you prefer.
4.2 File
Here you can choose the video or audio saving formats.
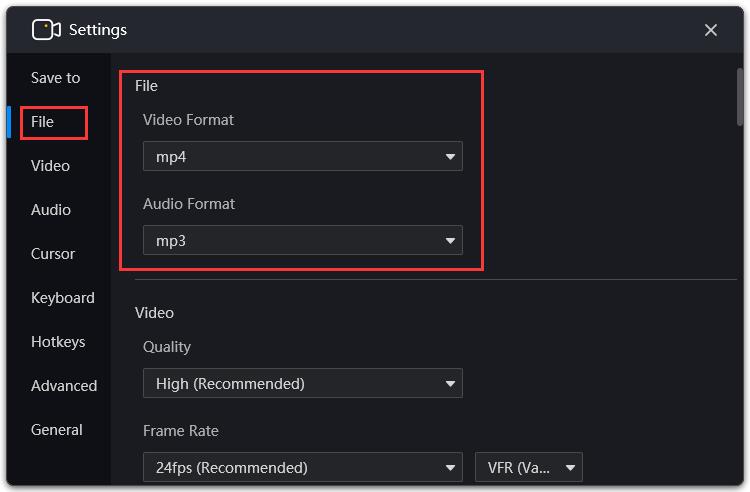
4.2.1 Video Format
RecMaster enables to capture video as MP4, FLV, AVI, and GIF. MP4 is recommended for its better compatibility with devices and streaming services.
4.2.2 Audio Format
When recording audio only, the output audio format can be set as MP3 or WAV.
4.3 Video
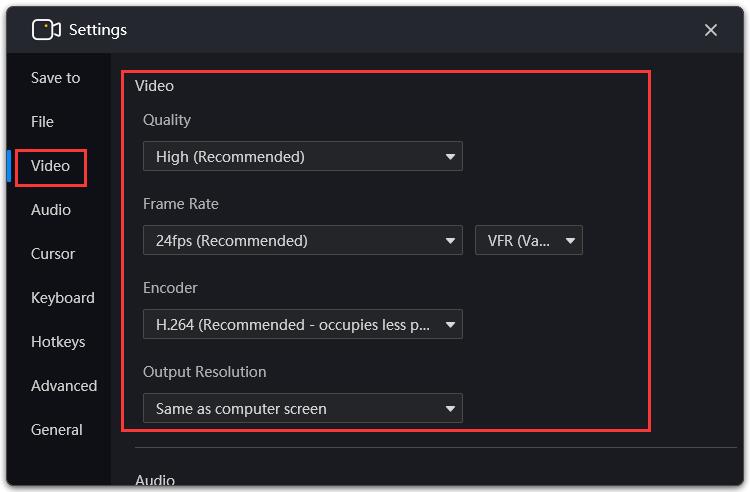
4.3.1 Quality
Three video quality levels are available here to choose: Standard, High(Recommended), and Original.
4.3.2 Frame Rate
In Frame Rate menu, you can choose 20fps, 23.976fps, 24fps(Recommended), 25fps, 29.97fps, 30fps or 60fps. You can also select CFR(Constant Frame Rate) or VFR(Variable Frame Rate) here.
4.3.3 Encoder
Here you can choose MPEG4(For computers with lower performance), H.264(Recommended - occupies less performance) or H.264(For smaller file size).
4.3.4 Output Resolution
In Output Resolution menu, you can select the size of the output recording screen: Same as computer screen, 1/2 computer screen, 480*360, 640*480, 800*600, 1024*768 etc.
4.4 Audio

4.4.1 Sample Rate
In Sample Rate menu, you can choose 8000Hz, 11025Hz, 22050Hz, 44100Hz or 48000Hz.
4.4.2 Bit Rate
Here you can set audio bit rate such as 64Kbps, 1218Kbps, 192Kbps, 256Kbps and 320Kbps.
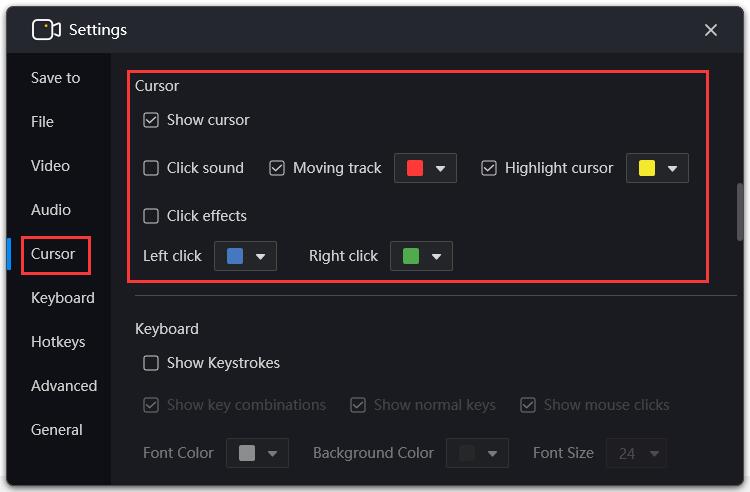
4.5 Cursor
You can decide whether to show your mouse cursor or not, enable click sound and determine its clicking effects (Left click & Right click).The color of Moving track and Highlight can also be selected.
4.6 Keyboard
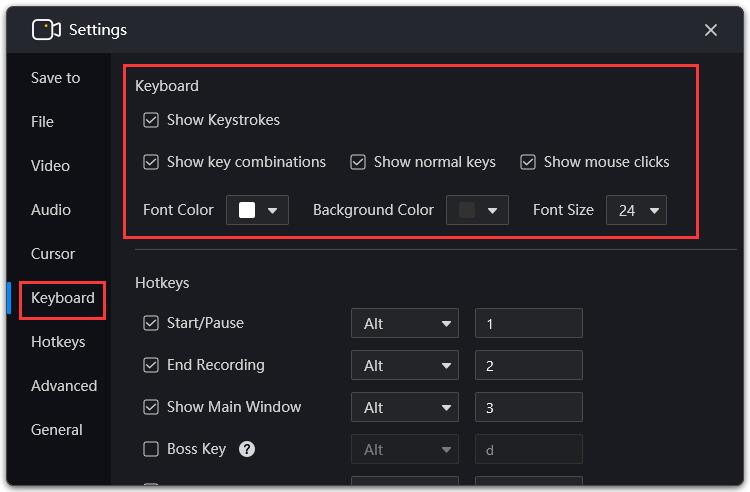
4.7 Hotkeys
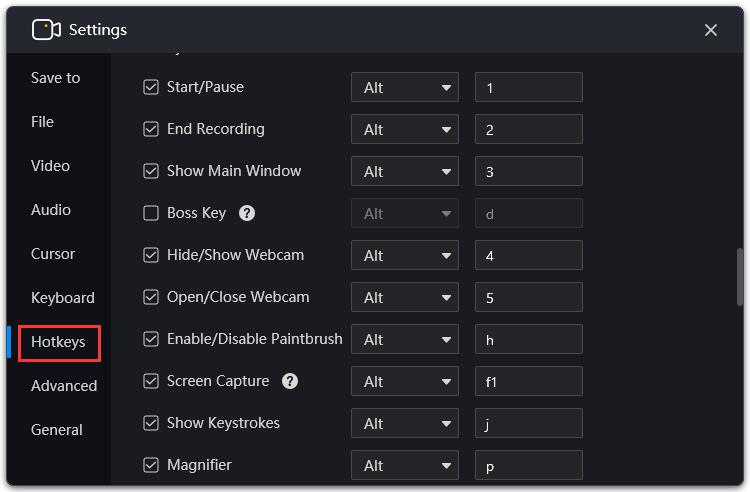
The hotkeys of RecMaster (Default)
Start/ Pause: Alt+1
End recording: Alt+2
Show main window: Alt+3
Boss key: Alt+d
Hide/ Show webcam: Alt+4
Open/Close webcam: Alt+5
Enable/Disable (Paintbrush)Annotation: Alt+h
Screen Capture: Alt+f1
Show Keystrokes: Alt+j
Magnifier: Alt+p
4.8 Advanced
Recmaster has some advanced settings such as Screen Capture, Game FPS, Watermarks,Show Countdown before recording, System Taskbar, and Status Bar.
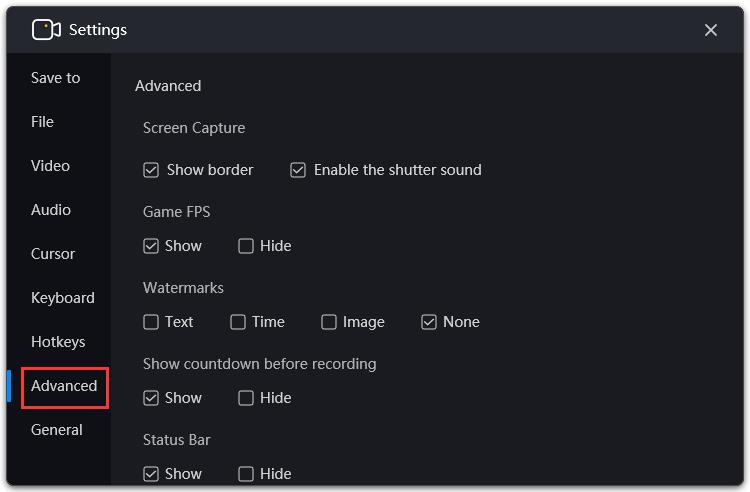
4.8.1 Screen Capture
You can choose to show border and enable the shutter sound.
4.8.2 Game FPS
When you are recording with Game Mode, you can choose to show FPS or hide.
4.8.3 Watermarks

4.8.4 Show countdown before recording
Only by checking the countdown option can you enjoy a 3-second countdown before recording.
4.8.5 Status Bar
When you need to capture screen with no sign of the recorder, you can tick this “Hide” option.
4.8.6 System Taskbar
You can decide show or hide your system taskbar in the recordings.
4.9 General
Here are some general settings: Boot, Complete Recording and Close the Program.
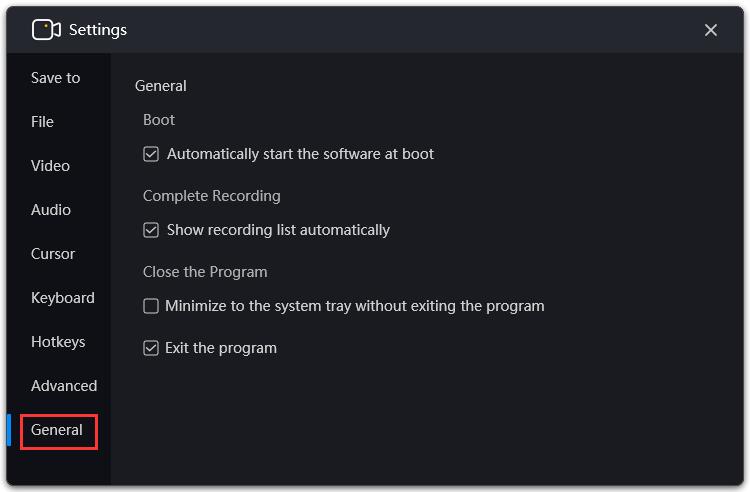
4.9.1 Boot
You can define whether to run RecMaster automatically when Windows starts, and whether to start full-screen recording when software is launched. The limitation on maximum of recording length is 99H99Min and you can customize the auto-record duration.
4.9.2 Complete Recording
Here you can decide whether to show the recording list automatically after the recording ends.
4.9.3 Close The Program
When you want to close RecMaster, you can choose to minimize it to the system tray without exiting the program or exiting the program.
Edit Recording
By clicking Edit icon from the recording list, you will see an editor control pop up. In this control, you can cut video into pieces, select and delete any piece of them, select and export any piece of them, remove the logo (delogo), add subtitle, as well as export remain content after deleting. If the video is too long or too short, just tweak the time axis to do more precise editing.
To merge videos, you can go back to the main interface of RecMaster, press the list icon on the bottom-left to expend the recording list, select the right videos and press Merge.
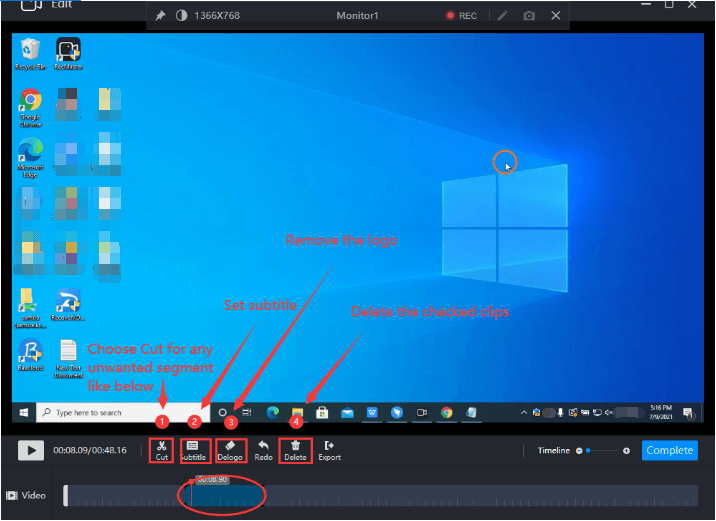
Note: The edit feature is only available for videos now. If you want to edit your audio recording, you should turn to a third-party audio editor.
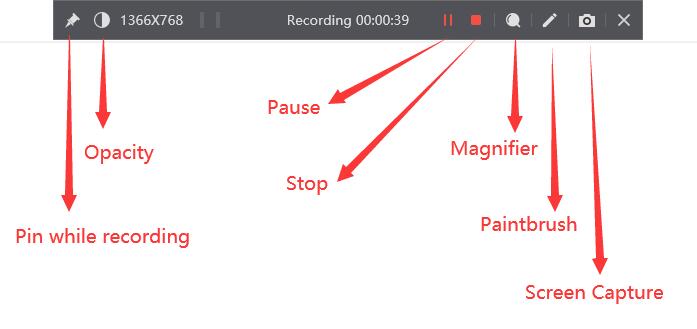
Floating Toolbar
If you don’t tick the option “Show” under Settings>>Advanced>>Status Bar, you will see the floating toolbar during recording process.You are allowed to pin the toolbar while recording and set the opacity of it. It’s actually a small panel which offers pause and stop recording buttons, shows recording duration, and allows you enter into main window or paintbrush(annotation) panel. You can also use a magnifier to zoom in on the part of the area where the cursor is located.
Paintbrush/Annotation
It’s actually a drawing panel which helps you create a more demonstrable and engaging video. You can utilize it to do real-time annotation by selecting content, adding lines/texts/number arrow or drawing some marks by yourself. Make sure you don’t hide the floating bar under settings, because you can only navigate to draw panel from floating bar.

Thanks to all RecMaster users who trust our product and motivate us to make our software better and better.